RV awning repair is one of the unpleasant occurrences. Since the awning is a component, which makes the RV look more comfortable, you have a special approach.
The first thing that goes through an RV owner’s mind is if there will be need to buy a complete new one. Then you start hoping for the best and thinking you can do something to prevent the situation from getting worse.
I can tell you now that in most cases there will be no need to get a new replacement awning. All it will take is several good supplies and some know-hows to do you camper awning repair.
This article will give you all the information you need to be able to do the RV awning repair yourself either at home or during camping.
We will also learn some tips on making sure no damage happens to your awning, so there will be no need for camper repair.
To avoid any unnecessary occurrences, check out my travel trailer camping tips.
- Reasons for the awning getting torn and RV awning repair in this case
- RV awning repair work caused because of the material
- Camper awning repair work caused because of the awning age
- RV awning repair caused by manufacturing quality
- Camper awning repair caused by weather
- RV awning repair caused by poor maintenance
- Camper awning repair DIY tools and materials
- The first step is to remove the awning
- Determining the severity of your RV awning repair work
- Minor awning damage
- How to do RV awning repair in case of minor damages?
- Sensible awning damage
- How to do camper awning repair in case of sensible damages?
- Severe awning damage
- How to reattach the awning after camper awning repair work?
Reasons for the awning getting torn and RV awning repair in this case
You may be the most caring RV owner in the world, but this does not guarantee your camper from getting damaged.
Do not feel bad when you have to deal with RV awning repair. Camper awning repair work are not always connected to maintenance issues. There may be various reasons.
RV awning repair work caused because of the material
First, you need to remember that all travel trailer awnings are made of vinyl or acrylic. The fact these materials are pretty durable helps the camper awning to be less prone to getting damaged.
However, there are camper awnings, which are made of canvas and cloth. In these cases, the awning is extremely prone to getting torn and damaged easily.
These fabrics have no sustainability for any camping rigors.
Nonetheless, regardless of what the awning is made of, there is no way it can be invulnerable. Countless factors can cause you to get into camper awning repair work.
Camper awning repair work caused because of the awning age
Awning will wear out. Absolutely all the components in your camper, all the appliances have a certain expiration date. They get older and therefore worse operating.
The purpose of the awning is saving from the sun. It means that the material is always exposed to direct sunlight. Therefore, it wears out and gets thinner.
You can follow all the possible maintenance points. Nonetheless, there is nothing you can do against aging of the material.
RV awning repair caused by manufacturing quality
There is always the good quality of one item and the poor quality of the same item. The same going for RV awning.
If you decide to pay less for the awning, be ready to pay again for the awning very soon. Simplest thing ever, you pay less, you get to use the product for a shorter time.
Camper awning repair caused by weather
Weather is the most unpredictable thing. You can check the forecast however many times you want. You are never guaranteed the weather you expect.
Therefore, severe weather consequences include awning damages. You may simply not be able to roll in the awning in time, before the storm hits.
RV awning repair caused by poor maintenance
Of course, camper awnings are not generators. They require far less frequent maintenance. Nonetheless, there are certain taking care processes you need to do.
The most basic example is packing the awning while wet after a rainy day. This keeps the moisture in and can cause molds. This will shorten the life of the awning.
Keeping the camping experience intact and pleasurable will be easier with my RV checklist.
Camper awning repair DIY tools and materials
I can relate that whenever you see something wrong with the awning, you immediately want to take it down and start your RV awning repair. STOP!
Before you even start the camper awning repair process, there is a number of tools you will definitely be needing.
Different from the other parts, the RV awning repair is a real project. There is no need to do some serious expertise.
The very first thing you need to do is open the owner’s manual and read whatever point is dedicated to the awning. You have got to know everything about the awning.
In fact, the most important information is what material the awning is made of. This will help you with the choice of the tools, as well as the materials, with which you will do your camper awning repair work.
If you have the chance, do contact your trailer manufacturer. This will give you the chance to do your RV awning repair with the exact same material as well the color of the original awning.
This way you will make sure the original look is still there and if you plan to sell the trailer, the future buyers will never suspect that you have changed or replaced the awning.
I have an approximate list of tools, which you might need for camper awning repair, depending on how bad the situation is.
A tape measure is really useful for any repair job you may do. Different size screwdrivers should definitely be there.
A plastic or a wooden board, which will serve as a base for any work you have to do. Good quality and sharp scissors, as well as a canvas needle.
The rest of the list will come during the camper awning repair work.
Let’s proceed to the step by step manual on how to actually replace and do camper awning repair work.
Also make sure to check out my article on RV fridge problems.
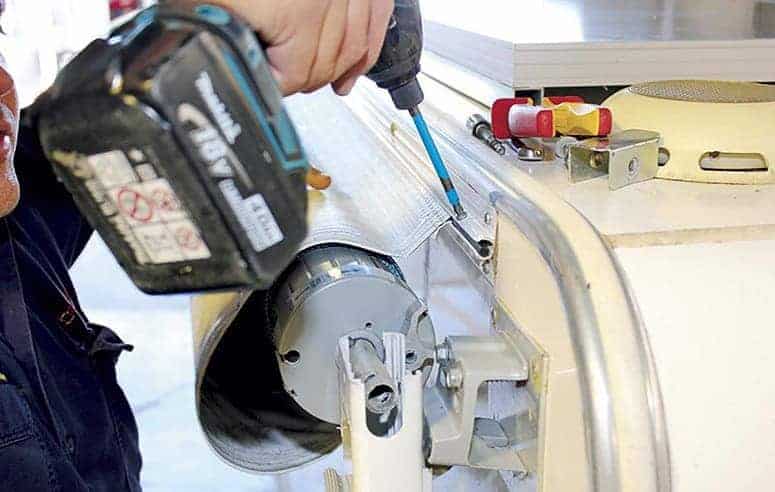
The first step is to remove the awning
Of course, we will start by taking the awning off. Remove the awning by unscrewing all the screws, which hold the thin in place.
If you think you can do the RV awning repair work while the awning is in its place, you are wrong. Taking it down will give you more access to all the areas of the damage.
In case you are unsure of how to remove the awning, there is section dedicated to the awning in the owner’s manual. It also includes the removing process description.
I personally advice you not to do the removing part alone. Of course, if everything is done correctly, the awning will not just drop on the ground.
However, having a helping hand would never hurt. Besides, you will be guaranteed from any unwanted injuries.
Almost all RV awnings have the same construction in terms of the installation. The main base, which holds the awning on the camper are the metal arms on both sides.
Each one has a lock, which make sure the awning is properly attached to the trailer.
The first step for removing the awning is to loosen the travel locks on each metal arm and then turn the cam locks. This will make the awning to roll open.
After you have successfully opened up the awning, you will have access to the so-called end caps. However, they are not supposed to be taken off. What you need to do is removing cotter pins from the caps.
The final step are the tag bolts and removing the rest of the screws, which are keeping the awning on the metal arms.
Determining the severity of your RV awning repair work
So, we are at the next stage. The awning is taken down and fully open. Do not be lazy to spend the extra time to examine the awning two to four times.
You may always see something you haven’t noticed before.
Additionally, make sure you have touched and felt all the other parts of the awning. Check for thinning areas. The damage might be coming to other parts of the awning as well and might not notice it.
Now, let’s see what kind of damage can be classified to what severity.
Minor awning damage
Small rips are hard to notice at first sight. You should inspect them very thoroughly, in order to be able to see them.
In case there is no actual tear, which would demand an awning replacement, there should be no need to worry about.
In short, minor damages are not a reason to replace your awning. If the holes bother you that much (which, in this case if they are too small, you should not even notice them), you can just duct tape them and it is all.
How to do RV awning repair in case of minor damages?
In case you are dealing with this state of severity, you are definitely lucky. All you would really have to do it just patching up work.
The first step is to make sure the awning is clean from every little dirt on it. It is extremely important to clean both sides.
Sure, you can save some time and just clean whatever parts should be patched. However, imagine how the awning would look when there are certain parts shining spotless and the remaining of the awning is dirty.
Cleaning itself may damage the material. Therefore, you need to be careful with the force you use on the awning, not to make the tears bigger.
You can only start the camper awning repair process once the material is completely dry. Take the flat board from the above-mentioned list and make sure the awning material is flat on it.
The final touch is the awning tape. In order to avoid any air bubbles, flatten the awning tape after applying.
Sensible awning damage
This category gives a few more reasons to be worried about. The material itself may be intact. However, if you are dealing with two and more normal size tears, this is a subject of camper awning repair work.
Most of the time, when dealing with awning materials, they have the tendency to spread the tears around and make them bigger. Therefore, you need to address the issue right away, as soon as you notice them.
How to do camper awning repair in case of sensible damages?
In this case, the awning tape would be of absolutely no use. This is when the material for awning replacement will come in handy.
This is where you will do some patchwork. Measure each tear and add at least three inches to it. Don’t safe on the material. There is a risk you will not be able to cover the entire tears if you cut by the exact number.
Cut the material for each tear and use either a waterproof glue or the sewing kit for the awning material from the above-mentioned checklist.
Use the same flat board and go around the material to cut the necessary pieces. After changing the position of the material, make sure it is flat on the board.
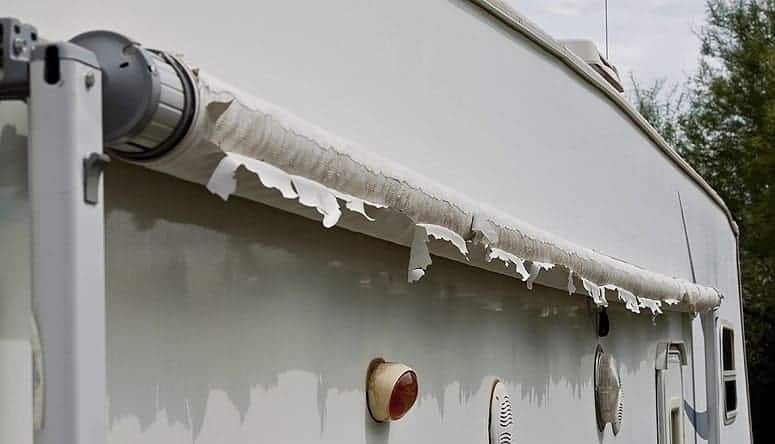
Severe awning damage
There is no need to do a careful inspection in order to determine that the damage is severe. The material should be so thin that you would be able to see the sky through it.
This is when you have to do the RV awning repair and replacement.
How to reattach the awning after camper awning repair work?
Congrats. The awning is ready to be back on the trailer. All there is left is the reattaching part and you are ready to go.
Remember I told that it would definitely help to have someone as an assistant when taking down the awning? Well, this time you absolutely need to have someone by your side.
Obviously, you will have to repeat the same actions just in reverse mode. The awning can sometimes be very heavy.
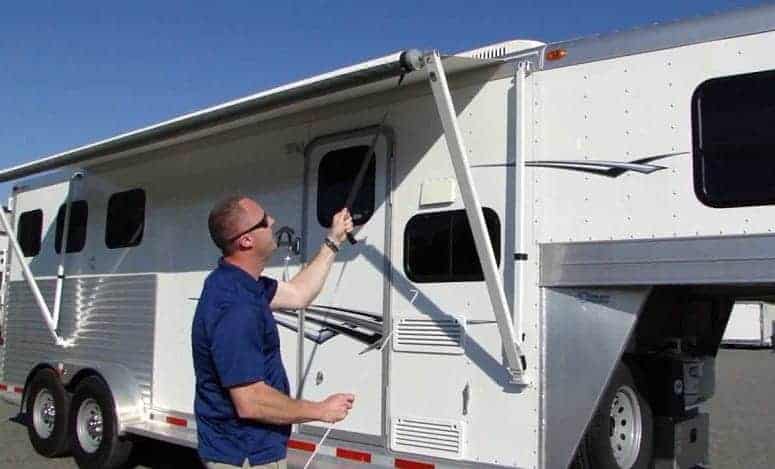
Therefore, before you even start the process, be certain that you have all the necessary parts near you. Bolts and metal arms the first place.
There is a good chance you may not be able to find the correct side of the awning, since you have been turning it around so much.
This is also an important factor. Put it on the right side before starting to attach it back to the camper. Besides the awning being strongly attached to the camper, it needs to be able to fold out and in easily.
Otherwise, you will be risking new tears very soon. Moreover, all the component mechanisms should work perfectly. The awning needs to be properly secured to the metal arms.